Nearly 20% of newly planted landscape trees die within their first twelve months in the ground. Watching fresh foliage droop leaves you second-guessing every drop of water, wondering whether you are starving the root system or suffocating it beneath dense clay. If you find yourself asking how to ensure my new tree survives, you don’t have to leave your property’s value to guesswork.
It’s frustrating to pour time and hard-earned money into a sapling only to watch it struggle with transplant shock. Tree survival rarely comes down to luck; it depends on setting the root flare above grade and delivering slow, deep hydration instead of brief surface sprinkling.
By mastering the fundamentals of planting depth, deep watering, and root shock prevention, you can protect your investment and keep your tree thriving for decades. Ahead, we outline the exact first-year establishment protocol you need to manage clay soil, stake correctly, and cultivate vigorous canopy growth from day one.
Key Takeaways
- Discover how to ensure my new tree survives by exposing the root flare and digging a planting hole two to three times wider than the root ball.
- Avoid the “bathtub effect” in dense clay soil by backfilling strictly with unamended native dirt rather than bagged potting soils.
- Master the first-year hydration formula using caliper-based deep soaking to keep roots moist without suffocating them.
- Protect the trunk bark against moisture rot, pests, and collar disease by using the donut mulching method and ditching mulch volcanoes.
- Learn early diagnostic triage steps to quickly tell under-watering apart from over-watering before permanent canopy dieback sets in.
Understanding Transplant Shock: Why Newly Planted Trees Struggle
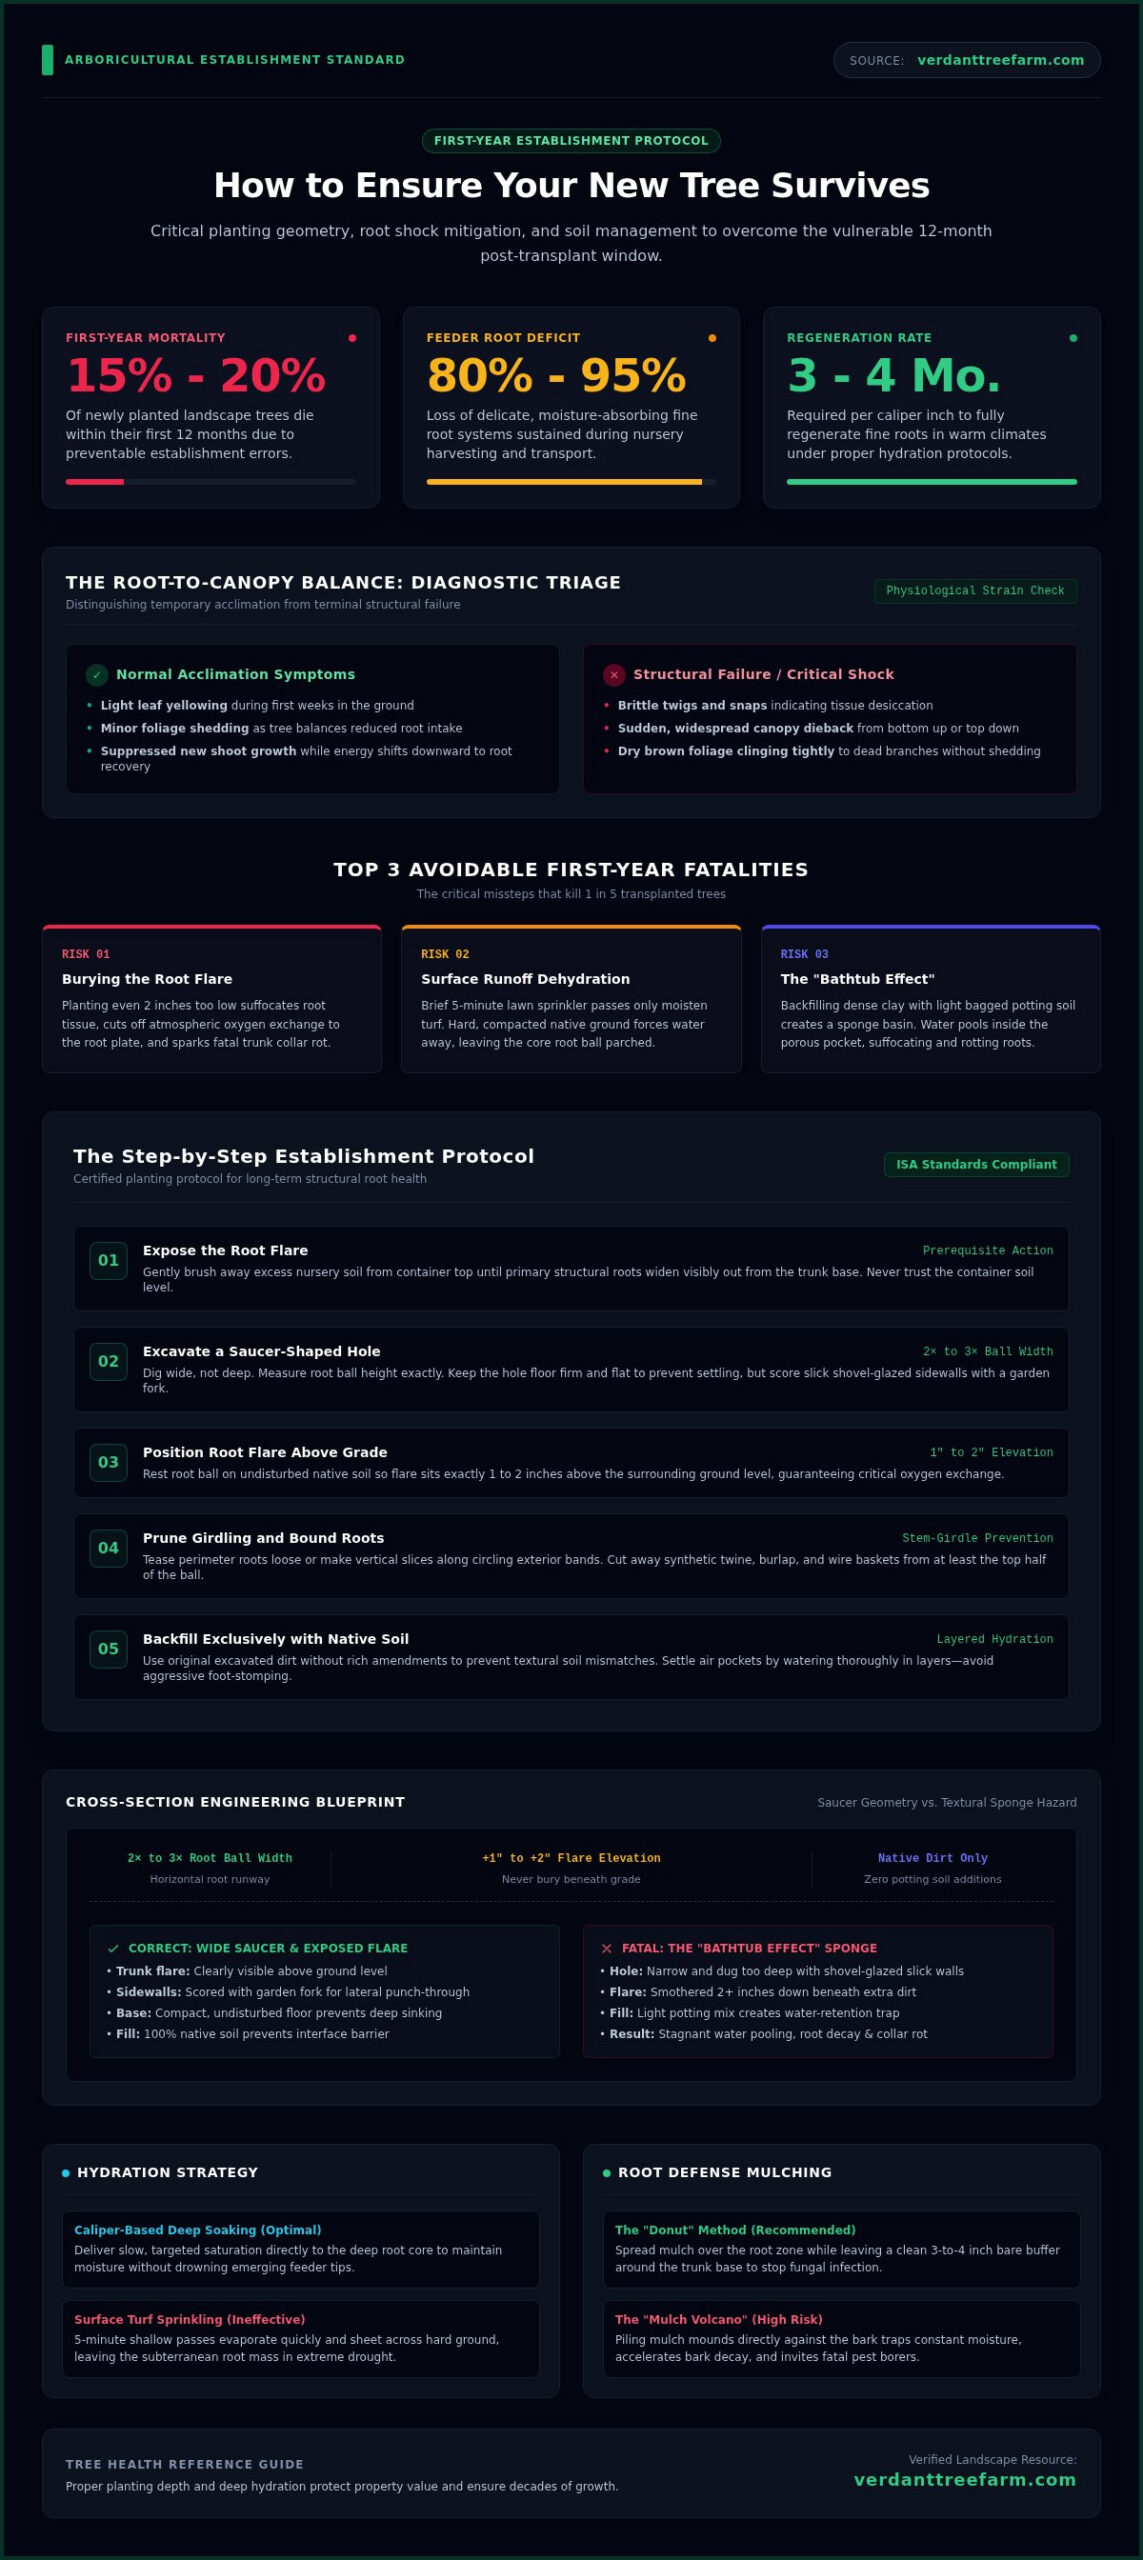
Every newly planted tree enters your yard in a compromised state. During nursery harvesting and transport, balled-and-burlapped stock loses between 80% and 95% of its fine, moisture-absorbing feeder roots. Container-grown specimens often suffer from bound, circling root systems that struggle to branch out into native ground. This sudden disruption triggers transplant shock, a biological crisis where damaged roots simply cannot intake enough water to sustain the leafy canopy above. In warm southern climates, fine roots require roughly three to four months per caliper inch to fully regenerate. Quick five-minute passes with a lawn sprinkler only moisten surface turf, leaving the deep root ball parched. Learning how to ensure my new tree survives starts with diagnosing and easing this physiological strain.
The Root-to-Canopy Balance Explained
A full canopy constantly releases water through leaf transpiration. When reduced root volume cannot replace that lost moisture, the tree sheds leaves as an emergency defense mechanism to prevent total desiccation. You must know the difference between mild acclimation and outright structural failure. Light leaf yellowing or minor shedding during the first few weeks is normal. Conversely, brittle twigs, sudden canopy dieback, or dry foliage clinging tightly to dead branches indicate that structural roots are failing to establish.
Key Factors Driving First-Year Tree Mortality
Research confirms that roughly 15% to 20% of landscape trees die within their first twelve months. Most of these losses come down to three avoidable mistakes:
- Burying the root flare: Planting too deep suffocates root tissue, denies oxygen to the root plate, and sparks fatal collar rot.
- Chronic dehydration from surface runoff: Hard ground causes water to sheet away, leaving the interior root ball completely dry despite regular watering.
- Compacted clay soil: Dense, unworked clay blocks air exchange, trapping stagnant water around vulnerable roots and driving root decay.
Overcoming these soil hurdles gives your tree the foundation it needs to build a permanent, vigorous root system.
The Step-by-Step Planting Protocol That Guarantees Root Survival
Fertilizer won’t save a tree planted at the wrong depth. When homeowners ask us how to ensure my new tree survives, the answer almost always comes down to hole geometry and root flare positioning. Planting just two inches too low in heavy ground suffocates emerging root tips, leading to a slow decline over several years. Following the certified ISA tree planting protocol protects your specimen from early failure.
- Expose the root flare: Gently brush away excess nursery soil until the top structural roots widen out from the trunk base.
- Excavate a saucer-shaped hole: Measure the root ball height from the base to the flare, then dig two to three times wider than the root mass.
- Place and align: Set the tree on undisturbed soil so the flare sits one to two inches above the surrounding ground grade.
- Prune girdling roots: Slice through bound container roots or snip synthetic twine, burlap, and wire baskets away from the top half of the ball.
- Backfill with native soil: Fill the space using original dirt, watering thoroughly in layers to settle air pockets without foot-stomping.
Excavating the Perfect Hole Dimensions
Dig wide, not deep. Native roots spread horizontally to breathe. Digging two to three times wider than the root ball loosens compacted dirt, giving new roots an easy runway. Keep the bottom of the hole firm and flat so the tree cannot sink. In dense clay, smooth shovel blades glaze the hole’s edges into slick walls. Use a garden fork to score those sidewalls so lateral roots can easily punch through.
Locating the Root Flare and Correcting Circling Roots
Nursery containers often arrive with several inches of excess soil covering the flare. You must pull this away before digging. If circular roots wrap around the root ball perimeter, tease them loose or make shallow vertical slices along the exterior. Left unchecked, those roots turn into stem-girdling bands that choke the trunk as it thickens.
Backfilling and Settling Without Suffocating Roots
Never fill the planting hole with rich bagged potting mix. In dense clay, this creates a textural sponge called the bathtub effect; water pools inside the porous pocket, rotting the roots while surrounding soil stays dry. Backfill exclusively with your native dirt. Water gently halfway through backfilling, let it drain, and finish filling. Lightly tamp the soil by hand rather than packing it down with heavy work boots.
Handling large container specimens or field-dug oaks requires precision tools and back strain. If you prefer experienced hands to guarantee proper elevation, turning to professional landscaping services Houston homeowners rely on will protect your investment with professional installation backed by a solid three-month warranty.
Mastering the First-Year Watering Schedule: Deep Soaking vs. Root Rot
Sprinklers won’t cut it. Surface moisture evaporates in the afternoon heat, leaving the interior root ball parched. If you want to know how to ensure my new tree survives its first season, adopt a disciplined, volume-based irrigation routine. Following an established new tree watering schedule ensures moisture penetrates directly into the root core where thirsty roots need it most.
Always verify moisture before running the hose. Use the screwdriver test: push a standard six-inch metal screwdriver straight into the root ball. If it slides in smoothly and emerges cool with damp soil specks, your moisture levels are fine. If you meet hard, dry resistance, hydrate immediately. If the shaft comes up coated in slick, muddy muck, stop watering.
| Trunk Caliper | Spring & Fall | Summer (90°F+) | Winter Dormancy |
|---|---|---|---|
| 2-Inch Caliper | 4-6 gal (2x weekly) | 4-6 gal (3x weekly) | 4-6 gal (every 10-14 days) |
| 3-Inch Caliper | 6-9 gal (2x weekly) | 6-9 gal (3x weekly) | 6-9 gal (every 10-14 days) |
| 4-Inch Caliper | 8-12 gal (2x weekly) | 8-12 gal (3-4x weekly) | 8-12 gal (every 10-14 days) |
Calculating Water Volume by Trunk Caliper
A reliable standard is delivering roughly two to three gallons of water per inch of trunk caliper per irrigation cycle. Measure your trunk diameter six inches above the root flare. Rather than blasting the root zone with high pressure that washes away soil, apply water slowly. Coil a perforated soaker hose around the root ball, or place a five-gallon utility bucket drilled with two 1/8-inch weep holes at the base to let water trickle directly into the ground.
The Dangers of Standing Water in Heavy Clay
Dense clay soil particles pack tightly together. When overwhelmed with water, clay pores trap standing moisture and block out vital oxygen, creating anaerobic conditions that suffocate roots. Rotting root tips produce symptoms identical to dehydration: leaves wilt, turn yellow, and drop because drowned roots cannot transport moisture to the foliage. After heavy tropical storms or multi-day rainfall, suspend all supplemental watering until your screwdriver test confirms the top three inches of soil have dried out.
Mulching, Staking, and Soil Care: Creating the Root Defense Zone
Creating a protective barrier around the base shields young roots from searing heat and sudden freezes. Understanding how to ensure my new tree survives means pairing smart planting depth with an active defense perimeter. High soil temperatures dry out newly formed feeder roots in hours, while aggressive turfgrass steals vital subsurface water. Establishing a clean mulch zone solves both problems at once.
Do not pile mulch against the trunk. This common landscaping blunder, known as a mulch volcano, traps continuous moisture against the trunk collar. Wet bark softens, opening entry pathways for destructive boring insects, wood-decay fungi, and bacterial cankers that quickly kill young saplings.
The Donut Mulching Method
Spread a uniform 2- to 3-inch layer of double-shredded hardwood or native bark over the entire excavated root area. Keep mulch pulled back 3 to 4 inches away from the trunk flare, creating a clear donut hole where air circulates freely against the bark. Build a slight 2-inch raised berm ring along the outer edge of the root perimeter. This rim acts as an earthen dam, catching water and forcing it downward into the root ball instead of letting it run off across your lawn.
Staking Guidelines: Support Without Restriction
Most young trees don’t need staking. Allowing the trunk to sway naturally in light winds triggers the production of reaction wood, which thickens trunk caliper and stimulates deep anchoring roots. Stake only in exposed, high-wind corridors or when dealing with top-heavy evergreen canopies. When staking is necessary, follow these strict rules:
- Use wide straps: Secure the trunk using broad, flexible canvas or rubber straps instead of bare wire or garden hose.
- Allow slight movement: Fasten ties loosely enough to permit two to three inches of natural sway.
- Set a timer: Remove all stakes, posts, and guy lines after one full growing season to prevent trunk girdling.
Fertilization Restraint and Root Stimulators
Skip the high-nitrogen granular fertilizer during your tree’s first year. Forcing rapid canopy growth overtaxes a recovering root system, pulling moisture away from underground tissue and causing severe leaf scorch. Instead of chemical synthetics, apply liquid mycorrhizal fungi or organic seaweed extracts to stimulate lateral root branching safely.
Long-term health begins with premium stock raised to withstand regional weather extremes. Visit the leading tree nursery Houston property owners trust to select climate-acclimated native trees and pick up the right organic amendments for your soil.
Diagnosing Trouble Early: Interventions and Long-Term Care Strategies
Trees communicate their distress well before structural branches die back. Catching stress symptoms in the first few weeks gives you time to correct hydration or soil issues before root loss becomes irreversible. Knowing how to ensure my new tree survives means learning how to interpret canopy cues and making swift, informed adjustments.
Reading Leaf and Branch Warning Signs
Foliage patterns reveal what is happening underground. Crisp, brittle brown leaf edges indicate dehydration, sun scorch, or rapid moisture loss. Soft, limp yellow foliage starting on lower inner branches signals over-saturated soil where roots cannot pull in oxygen. Check branch viability with a simple scratch test:
- Use your thumbnail: Lightly scrape the thin outer bark on a pencil-sized twig.
- Check the cambium: A moist, bright green layer beneath the bark means that branch is healthy and active.
- Assess brittleness: Dry brown or gray wood that snaps cleanly indicates branch dieback.
- Inspect for secondary pests: Look beneath drooping leaves for spider mites, aphids, or scale insects that prey on moisture-stressed saplings.
Preparing Young Trees for Severe Seasonal Extremes
Severe weather spikes test newly planted saplings. Before an unexpected hard freeze, soak the root zone thoroughly 24 hours in advance. Wet soil retains daytime heat significantly longer than dry dirt, protecting tender roots from freeze damage. For thin-barked varieties like Drummond Red Maple or Texas Redbud, wrap the trunk in breathable tree wrap through winter to prevent frost cracks and sunscald. During brutal summer heat waves exceeding 100°F, set up a temporary burlap screen on the south or west side to filter harsh afternoon light until roots stabilize.
When to Seek Professional Arboricultural Consultations
Homeowner troubleshooting reaches its limit when trees sink below grade or battle severe soil compaction. Re-lifting a settled root ball without tearing fresh feeder roots requires specialized rigging. If your canopy continues to thin despite correct watering and mulching, an on-site professional assessment helps isolate soil chemistry problems or hidden root girdle issues before the tree fails completely. The specialists at Verdant Tree Farm offer direct guidance, healthy Texas-grown stock, and expert maintenance consultations to keep your landscape thriving season after season.
Give Your Roots the Foundation for Lasting Growth
Mastering how to ensure my new tree survives comes down to disciplined basics: setting the root flare above grade, skipping loose soil amendments in clay, and delivering slow, deep hydration measured by trunk caliper. Pair those practices with donut mulching and first-year fertilizer restraint, and your young tree will establish an extensive root anchor capable of handling harsh seasonal weather swings.
You don’t have to navigate tree establishment alone. As Houston’s largest independent tree nursery, our veteran-owned team provides hardy, heat-acclimated trees along with professional installation backed by a dependable three-month warranty. If your foliage looks stressed or you need hands-on diagnostic support, our on-site maintenance consultations deliver the practical expertise you need. Visit Verdant Tree Farm to discover native trees backed by our 3-month warranty and grow a thriving canopy for your property today.
Frequently Asked Questions
How often should I water a newly planted tree during its first summer?
Water your tree two to three times per week during a typical Houston summer, delivering two to three gallons per caliper inch each cycle. When temperatures consistently exceed 95°F, check soil moisture daily using the screwdriver method. If the root ball feels dry two inches down, add a supplemental deep soak. Avoid light daily surface sprinkling; slow, concentrated watering directly over the root zone keeps roots actively expanding through dense clay.
What are the early signs that my newly planted tree is dying?
The earliest warning signs include uniform leaf curling, premature browning inward from the leaf margins, and stalled bud growth. If twigs snap cleanly and reveal dry brown tissue under the bark instead of moist green cambium, those branches have died. When you wonder how to ensure my new tree survives during sudden decline, check the trunk flare immediately. Settling below grade or ponding water will suffocate roots long before canopy symptoms appear.
Can you save a new tree suffering from severe transplant shock?
Yes, you can rescue a tree experiencing transplant shock if the inner bark still shows pliable, green cambium tissue. Stop all chemical feeding immediately, as salt-heavy fertilizers burn recovering root hairs. Build a wide donut mulch ring to cool the soil, and adjust irrigation to soak the root ball directly rather than surrounding turf. If the tree settled too deeply in heavy soil, scheduling an on-site maintenance consultation to evaluate re-lifting the root flare can reverse decline.
Should I fertilize my new tree immediately after planting it in my yard?
No, you should never apply synthetic, high-nitrogen fertilizer to a newly installed tree during its first growing season. Added nitrogen forces rapid leaf and shoot flushes that damaged roots cannot hydrate, worsening transplant shock and scorching tender foliage. Focus entirely on structural root development instead. You can apply gentle organic root stimulators or mycorrhizal inoculants during planting, but wait until the second spring before introducing balanced fertilizers into your care routine.
How do I know if I am overwatering or underwatering my new tree?
Check the physical texture of drooping leaves alongside the moisture level in the root zone. Underwatered foliage turns brittle, crispy, and curls upward while the surrounding ground feels rock-hard. Overwatered leaves become limp, soft, and pale yellow, often dropping while still flexible while the soil smells stagnant and muddy. Understanding how to ensure my new tree survives requires balancing these symptoms; when in doubt, probe the root ball with a long screwdriver before adding water.
How long does it take for a newly planted tree to become fully established?
A newly planted tree in the Houston area generally requires one year of establishment care for every inch of trunk caliper. A two-inch Shumard Oak or Drummond Red Maple typically needs two full growing seasons to regenerate its root matrix and support unassisted growth. During this establishment window, roots remain largely confined to the original planting area. Maintain regular deep watering schedules and protective mulch rings until root growth extends past the canopy edge.
Is it necessary to stake every new tree planted in the landscape?
No, staking is not necessary for every tree and should only be used under specific landscape conditions. Trees with dense, top-heavy canopies or those planted in open, wind-swept Gulf Coast corridors benefit from temporary stabilization. Otherwise, unstaked trunks flex in normal breezes, which stimulates thicker caliper taper and builds sturdier root anchors. If you must stake, use broad canvas straps rather than abrasive wire, permit slight trunk sway, and remove all hardware within one year.